I DID IT! I finished February's UFO. It was #10 on Judy L's Patchwork Times UFO Challenge. It has actually been done for a week but I wanted to wait and post it at the last minute.
Despite the rather poor photo, I am very proud of this quilt. With the exception of the narrow purple border, I didn't purchase anything for this quilt.
I came home from work one day to discover a xerox-sized box of fabric scraps on my porch. The scraps were jammed in there so tightly that when I dumped it over, the scraps retained the shape of the box!!
My sister and I spent many days and nights pressing fabric scraps. I made this quilt by pulling all the light and dark floral scraps that I could find. I stitched string blocks on a paper foundation.
I hope everyone else is having success with their UFOs.
Monday, February 28, 2011
Design Wall Monday 2/28/11
Here is what I am working on
It is a fun round-robin challenge that my guild is doing. The twist is that we are each completing our own quilt instead of passing it around for others to add borders.
The initial directions were for us to choose a center block. I chose this mola of my MIL's.
Then, at each meeting, the challenge chairperson picks two guidelines for the next round of borders. The first round called for a 5-inch border that had something dimensional on it. I added the checkerboard borders on the top, right, and left and added the leaves for dimension.
The next round called for a 2-inch border with curves. I added more of the checkerboard and a vine to which I plan to add more leaves and flowers.
I welcome suggestions and critiques.
To see more design walls, check out Judy L's blog.
Sunday, February 27, 2011
Progress
I've had a very busy weekend in my quilt studio. Remember my blog where I professed to be SO OVERWHELMED by all my little projects? Well, I have had my nose to the grindstone and I have cleared out quite a few things that have been really hanging over my head.
1) I keep things. Not as bad as the man I live with but bad all the same. So. I keep all the little scraps from trimming batting. I just can't get myself to throw it away. But piecing it into a usable size is just such. a. drag. It dawned on me that I could piece them into usable squares and those would be easy to use in small quilts. I hauled out that embarrassingly large pile of batting scraps and started slicing them into 12 inch lengths.
Then I straightened one edge on each length and just started putting the pieces together.
I found that if I used this foot:
and a WIDE and LONG zigzag, they went together is a snap with a very smooth joint.
After a few DVRed episodes of Law and Order I had a very respectable pile of batt-lets. I managed to join two large pieces into a batting that measures 45" X 35". Since I use two types of batting, I made two separate batting blocks: The Warm and Natural I cut into 11" X 11" squares. I have enough to make a batting 55" X 77". I also made a pile of 10.5" squares from Hobbs 80/20. I have enough of those to make a batting 60" X 45".
Pretty productive and now I am not bothered by having a pile of unusable scraps all over the place.
More about my ongoing clean up in future posts.
Are you watching the Oscars? I am. Isn't Ann Hathaway gorgeous!!
1) I keep things. Not as bad as the man I live with but bad all the same. So. I keep all the little scraps from trimming batting. I just can't get myself to throw it away. But piecing it into a usable size is just such. a. drag. It dawned on me that I could piece them into usable squares and those would be easy to use in small quilts. I hauled out that embarrassingly large pile of batting scraps and started slicing them into 12 inch lengths.
This isn't even all the scraps! |
Then I straightened one edge on each length and just started putting the pieces together.
I found that if I used this foot:
Does anyone know what it's called?? |
and a WIDE and LONG zigzag, they went together is a snap with a very smooth joint.
After a few DVRed episodes of Law and Order I had a very respectable pile of batt-lets. I managed to join two large pieces into a batting that measures 45" X 35". Since I use two types of batting, I made two separate batting blocks: The Warm and Natural I cut into 11" X 11" squares. I have enough to make a batting 55" X 77". I also made a pile of 10.5" squares from Hobbs 80/20. I have enough of those to make a batting 60" X 45".
Batt-let blocks on the right. On the left are the scraps I am finally throwing away. |
Pretty productive and now I am not bothered by having a pile of unusable scraps all over the place.
More about my ongoing clean up in future posts.
Are you watching the Oscars? I am. Isn't Ann Hathaway gorgeous!!
Thursday, February 24, 2011
I'll understand if you look away
I travel frequently with a good friend of mine. On one particular trip I noticed her struggling to tweeze away a wiley little eyebrow hair. I didn't say anything but I did made a mental note of it. The next time I was shopping, I saw a portable magnifying mirror. PERFECT! I got two: One for her and one for me. Feeling very proud of myself, I packaged it and sent it off to her.
I brought mine to the office (remember I'm the boss and I have no employees so I can do all sorts of inappropriate things). Between appointments, I whipped that bad boy out and took a little tour of my face. DO NOT EVER DO THAT WITH A 10X MAGNIFYING MIRROR!! NEVER. EVER.
I was horrified at what I saw around my eyes and nose. I tell you, HORRIFIED. Immediately, I sent her an email warning her not to repeat my mistake. It was scary.
SO, my advice to all of you: Get a magnifying mirror because you can track down and eradicate every single stray eyebrow in the known world but DO NOT let your gaze stray from that area of your face.
You've been warned.
Here it is with the lighted tweezers she sent me |
I brought mine to the office (remember I'm the boss and I have no employees so I can do all sorts of inappropriate things). Between appointments, I whipped that bad boy out and took a little tour of my face. DO NOT EVER DO THAT WITH A 10X MAGNIFYING MIRROR!! NEVER. EVER.
I was horrified at what I saw around my eyes and nose. I tell you, HORRIFIED. Immediately, I sent her an email warning her not to repeat my mistake. It was scary.
SO, my advice to all of you: Get a magnifying mirror because you can track down and eradicate every single stray eyebrow in the known world but DO NOT let your gaze stray from that area of your face.
You've been warned.
Monday, February 21, 2011
Design Wall Monday
YAY! I finally have something new on my design wall.
I stitched all of the pink blocks on the left during the L O N G seminar last week. I am a little scared to admit it but I think I'm starting to like applique! Go figure. I finally figured out how to do the starch method for preparing app pieces and Man O Man! it went fast. I had barely adequate light in the seminar room and the blocks still look good.
The quilt these blocks are destined for is on my UFO list. I've been sneaking in a little work on them here and there because if the number gets pulled on Tuesday I'll be hard pressed to get it all done in the month. That challenge is one I do not want to fail. In fact, I finished this month's quilt and I'll post about it on Tuesday.
What's on your wall? Go to Patchwork Times and see what others have on their design walls.
Here's a quote by the man who inspired one of my favorite movies, Rudy:
Have a great week!
I stitched all of the pink blocks on the left during the L O N G seminar last week. I am a little scared to admit it but I think I'm starting to like applique! Go figure. I finally figured out how to do the starch method for preparing app pieces and Man O Man! it went fast. I had barely adequate light in the seminar room and the blocks still look good.
The quilt these blocks are destined for is on my UFO list. I've been sneaking in a little work on them here and there because if the number gets pulled on Tuesday I'll be hard pressed to get it all done in the month. That challenge is one I do not want to fail. In fact, I finished this month's quilt and I'll post about it on Tuesday.
What's on your wall? Go to Patchwork Times and see what others have on their design walls.
Here's a quote by the man who inspired one of my favorite movies, Rudy:
"Never Quit. "Don't ever, ever quit.
Recognize that stopping now,
regrouping to try a new approach isn't quitting.
If you quit you'll regret it forever."
~ Rudy Ruettiger Have a great week!
Saturday, February 19, 2011
Scrap Bin Show and Tell
A few clever people sent me photos of the scrap bins they made from my tutorial.
Look at the adorable bin Impera Magna made:
She even improved on my methods by using spray adhesive
Isn't Rhonda's adorable?
Look at the adorable bin Impera Magna made:
She even improved on my methods by using spray adhesive
Isn't Rhonda's adorable?
I am embarrassed to admit that I got a third photo from Texana (her HGTV forum name), She sent me a nice note with the photo asking if she could post it on the HGTV forum. She posted it and gave me a very nice shout out. THANKS! BUT, I have searched and searched all my messages and I can't find hers. I really wanted to post it here because she came up with a clever, alternate way to fasten the ends of the boxes closed. She didn't have enough fabric to overlap the ends so she added a tab on the top flap. It worked really well. If you are reading this, resend me the picture and I'll edit this post.
I spent the last two and a half days with my behind firmly planted in another of those educational seminars I am forced to take for my work. Since I got more than a few supportive comments about feeling guilty when I do handwork in these seminars, I went ahead and brought some with me. Most of the speakers were SO BORING that I got a lot accomplished. During breaks I noticed one gal working a counted cross stitch and another knitting. So I think I am in good company. All of the blocks I am working on are for an as-yet-unselected UFO from Judy's challenge. If I only had one more seminar, I think I would get all the Applique done.
It's late and I must get to bed. Tomorrow I am going to quilt the February UFO and get the binding attached. I'll still have to stitch the binding down and add a label before Monday night. YIKES! Wish me good luck.
I think this is an appropriate quote for tomorrow:
"Great works are performed not by strength but by perseverance."
~ Samuel Johnson
Monday, February 14, 2011
Don't hate me
I'm feeling chatty today because I have had 3 (THREE!) appointments cancel :-( (Can someone tell me how to get cute emoticons on my blog, please....).
So, I have used my time very wisely by blog-hopping. In reading other blogs, I realize that the weather in the other part of the country is much nicer than it has been. That doesn't stop me from wanting to post a few photos of what I am forced to face day in and day out.
I just walked out the front door of my office at 3PM today and took these photos.
This is the view from my corner, looking toward the bay.
These are some freesias already blooming in the front yard of my office.
This is my front yard at the office. Izzy can't resist a camera.
These are the cute apartments on the corner of my street. Notice no snow, blue sky, palm trees.
So, I have used my time very wisely by blog-hopping. In reading other blogs, I realize that the weather in the other part of the country is much nicer than it has been. That doesn't stop me from wanting to post a few photos of what I am forced to face day in and day out.
I just walked out the front door of my office at 3PM today and took these photos.
This is the view from my corner, looking toward the bay.
These are some freesias already blooming in the front yard of my office.
This is my front yard at the office. Izzy can't resist a camera.
This is just a gratuitous Izzy shot. She's wondering why she's in jail and I'm not.
These are the cute apartments on the corner of my street. Notice no snow, blue sky, palm trees.
Just so you don't think I'm awful, I am frequently jealous that you all have actual seasons and flowers! Oh!!! The flowers I see posted on your blogs! But I get over it.
Progress
I don't have any photos to post to show my progress (Bad Blogger!) but I wanted to catalog how I am doing about my quilt stress.
I took a good look around my studio and tried to zero in on what was the most bothersome. Some comments to my stress post helped me put my thoughts in order. It turns out that the mostly-finished UFOs don't really stress me as much as all the bits and pieces of things that "might" turn into quilts some day. I'm writing this from work (I work for myself so it's OK) or I would post some photos of the items I am about to list. Just off the top of my head, so you KNOW there are more, here is what I need to finish or move out so I can start to relax:
1. pastel 1/2 square tris
2. aqua and green 4-patches
3. Scotty dogs
4. 1" strips from Audrey
5. bag of kid prints and brights
6. string!!! OMG do I have strings!!
7. "dots" sampler blocks
8. pile of 3 " 1/2 square tris
Yesterday afternoon I also had a pile of Leader and Ender parts that were sitting next to my sewing machine. I have been using Bonnie's system for years. What I discovered this week is that if I don't have a specific project in mind then all the L/E parts just pile up and stress me out. So, yesterday, I gathered all the parts, pressed, trimmed and fed them into the appropriate "parts" drawer so they are ready for a project that needs them. I am replacing that jumble with a tidy bin that contains parts for an actual project. AHH, it feels good to have that mess gone.
Here's the rest of my plan: Each week I will complete or at least make significant progress on one of the items on the above list. I think I have just been waiting for enough other "parts" to make these half-done things into something bigger. Now, I am just going to finish them as smaller wall hangings and donate them to my guild's fund-raising auction. I am also going to move the things I am not working on into the guest bedroom (don't tell my husband) until their turn comes up in rotation.
This feels better but I am worried I am setting myself up for failure. Any suggestions, Oh Wise Ones?
I think this is an appropriate quote:
If you can dream it, you can do it.
-Walt Disney
Saturday, February 12, 2011
So Many Quilts, So Much Stress
It has been dawning on me over the last few weeks that I am starting to feel controlled by my "hobby." Quilting is my passion. It makes me happy, relieves stress, and makes me feel Oh So Virtuous to have pretty things to show for the hours I hole up in my studio.
In preparing for Judy L's UFO challenge, I dug through mystuff neatly organized storage and found 12 UFOs in about 5 minutes. The startling realization that I could identify 12 UFOs in so short of time shook me up a bit. I started paying more attention to my piles other areas of carefully organized craft materials and I have identified MANY more UFOs, PIGS, and parts for potential, but as yet unidentified, additional projects.
Now I am feeling pressure to finish these projects and get things cleaned up around here. Then....something new and pretty will catch my attention and before I know it I've got another project started.
Here is what I am committing to myself to do about this stress:
1. I will complete each month's UFO.
2. I will use a UFO as the leader/ender while I am working on another project (I tend to just make 4-patches as UFOs).
3. Since the bits and parts that are hanging around my studio stress me the most, I will come up with a design and spend one evening a week completing that project.
That's enough for now.
Does anyone else ever feel like this?
In preparing for Judy L's UFO challenge, I dug through my
Now I am feeling pressure to finish these projects and get things cleaned up around here. Then....something new and pretty will catch my attention and before I know it I've got another project started.
Bits and Parts that could some day be some really great projects. |
Here is what I am committing to myself to do about this stress:
1. I will complete each month's UFO.
2. I will use a UFO as the leader/ender while I am working on another project (I tend to just make 4-patches as UFOs).
3. Since the bits and parts that are hanging around my studio stress me the most, I will come up with a design and spend one evening a week completing that project.
That's enough for now.
Does anyone else ever feel like this?
Thursday, February 10, 2011
Scrap Bin Tutorial
I was in Bonnie Hunter’s class at Road to California just minding my own business when the gal next to me (Hi, Buff) grabbed my little trash container and started gushing about it. She showed Bonnie who also liked it so I decided to write a tutorial about it. If you like it you can make one for yourself.
MATERIALS NEEDED:
1 empty cube-shaped Kleenex box
Glue - I use Elmer's School Glue
A brush
A small container to mix glue and water
A piece of fabric 13 X 20.5
1" piece of hook and loop tape
Cut a piece of fabric 13 inches by 20.5 inches. A fat quarter works great for this. If possible, leave the selvedge on one of the 13-inch edges.
Next, pour about 4 Tablespoons of glue into a small container. I mix in about 1/2 teaspoon of water to make it easier to spread. Stir it up well and use a brush to apply the glue.
I start on the top and center the fabric over the hole. Place the fabric so the short side goes from open end to open end and the long side wraps around the box. I know this fabric looks different. Good observation! It is different because as I was putting this tutorial together, I thought a photo of this step would be good but I didn't take one when I made the original box.
On the bottom, I overlap the ends, gluing the selvedge edge on top for a nice, clean finish. Hopefully, you were able to leave the selvedge when you cut. If not, just turn the end under and use a bit more glue to make it all stick.
Let it dry for a good long time, at least until it’s not too tacky. I put a fan on mine to speed it up a little.
Turn the box so the hole is on top. Locate the hole and cut and "X" through the hole from edge to edge. Trim 1/2 inch inside the hole, so you are leaving about 1/2 inch of excess fabric. Cut slits into the extra 1/2 inch of fabric about every 1/2 inch so it will easily turn to the inside of the hole.
Working from the inside, apply glue around the hole and smooth the fabric to the inside. When it looks good and smooth, go wash your hands. Mine were a mess.
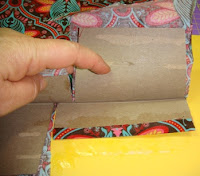
See how there is a little gap between the short and long flaps at the ends?
Cut into the gap right alongside the short end-flaps so there is a little fabric to wrap around the long end-flaps.
Then, glue along the edges of the long ends and wrap that skinny strip of fabric over the edge. This will give the outer flap a nice appearance.
Let it DRY COMPLETELY. Now would be a good time for a cup of coffee or a glass of wine, put your feet up and just wait patiently.
OK, my fingers are clean and I am ready to continue.
Fold up 1/2 inch of fabric on the long ends and press. Fold up another ½ inch and press again.
Cut two 1-inch sections of hook and loop tape.
Turn the box so the hole is on the top. Fold in the short side flaps and then the top and bottom flaps. See how much the top flap overlaps the bottom flap. It should be at least the width of your hook and loop tape. Adjust the folds of fabric on the top and bottom flaps so you have enough overlap.
Center the scratchy side of the hook and loop tape on the upper flap.
Using an old needle, sew the fabric to the flap, catching the hook and loop tape in the seam. I also sewed around the tape to make sure it was good and secure.
Fold the bottom flap up and mark where you need to attach the fuzzy half of the tape so it will line up with the scratchy side.
Put the tape on the RIGHT side of the bottom flap and stitch it as you did the top flap.
Step back and admire your new scrap bin. It is ready to accept scraps and threads and what nots.
It folds flat so you can take it to class or retreat. The ends open so you can empty it. What's not to love?
I'd love to see a picture of yours if you make one.
Reduce Reuse Recycle. It's a good thing.
Subscribe to:
Posts (Atom)