Just my musings about life, quilting, my family and my dog.
Showing posts with label scraps. Show all posts

Monday, December 10, 2012

DSW 12.10.12


I find myself in possession of WAY too many medium toned 2" squares!  I've been searching around for how to use them.  I usually make 1/2 triangles but I like to use only very high-contrast fabrics.  I find that when I use medium tones I get a mushy quilt.  Cindy at Quilt Patterns from Seattle posted a very cute Scrappy Heart pattern.  I really liked it but decided I didn't want to make that many more 1/2 square triangles so I came up this big heart that uses only FOUR HSTs  YAY!!  In the test heart I also used 2' background squares.  TOO MUCH WORK.  In the next squares I will use strips.

That's pretty much all I have going on.  OH, I'm also considering making Granny Squares with my mediums. I'm kinda liking the ones I've seen around blogland.

What's on your Design Wall?  Check out a bunch on Judy's blog.

Chris

Wednesday, May 9, 2012

Estate Sale

A dear quilting friend of ours passed away two years ago.  Her family asked our guild to pick up several boxes of fabric to use for our charity work.  They went through the 50 boxes her family put on the patio and culled fabric appropriate to our work.  They took about 25 boxes to Patti's house.  So, when I got an announcement that there was to be an estate sale at her house I didn't expect to find much.  I did have my eye on her Juki machine but I thought that was all I would take home.


I was a little wrong.

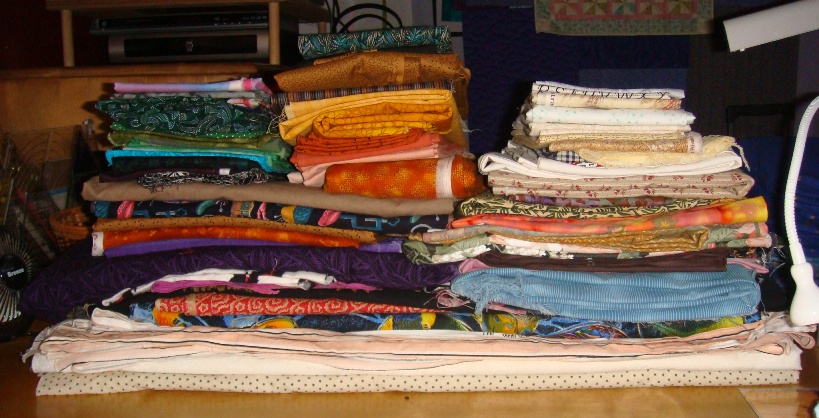
I dug in and managed to find 70 yards of excellent fabric.  The upper photo is stuff that I will feed into my stash.  The lower fabric is marked for Quilts of Valor.  You can see a glimpse of the Juki behind the QOV fabric!

I washed and folded for two days.  Washed and folded, washed and folded.  Oh My, was I tired by Sunday night.

Drumroll, please.  I was charged $50.00 for all this fabric.  I think I am going to have a lot of fun. 

What is your greatest fabric purchase?


Tuesday, May 8, 2012

Birthday Gift


It was my birthday a few weeks ago.  Yea me!!  My very good friend Patti gave me this super sweet quilt that she made especially for me.  It is about 18" X 24" made from "bonus triangles" and all hand-quilted.  I love love it. 

I've spent the last several years convincing my guild members that they can make really nice little quilts from the triangles you cut off when making flying geese or snowball blocks.  For the last few years they've just been giving the bonus triangles to me - thank you very much!!  Lately, however, I've been seeing some cute quilts made from these leftovers.  I can't wait to show it off at the next guild meeting.

What do you do with those triangles?


Monday, February 28, 2011

February UFO Challenge

I DID IT!  I finished February's UFO.  It was  #10 on Judy L's Patchwork Times UFO Challenge.  It has actually been done for a week but I wanted to wait and post it at the last minute.


Despite the rather poor photo, I am very proud of this quilt.  With the exception of the narrow purple border, I didn't purchase anything for this quilt.

I came home from work one day to discover a xerox-sized box of fabric scraps on my porch.  The scraps were jammed in there so tightly that when I dumped it over, the scraps retained the shape of the box!!

My sister and I spent many days and nights pressing fabric scraps.  I made this quilt by pulling all the light and dark floral scraps that I could find.  I stitched string blocks on a paper foundation.

I hope everyone else is having success with their UFOs.

Sunday, February 27, 2011

Progress

I've had a very busy weekend in my quilt studio.  Remember my blog where I professed to be SO OVERWHELMED by all my little projects?  Well, I have had my nose to the grindstone and I have cleared out quite a few things that have been really hanging over my head.

1)  I keep things.  Not as bad as the man I live with but bad all the same.  So.  I keep all the little scraps from trimming batting.  I just can't get myself to throw it away.  But piecing it into a usable size is just such. a. drag.  It dawned on me that I could piece them into usable squares and those would be easy to use in small quilts.  I hauled out that embarrassingly large pile of batting scraps and started slicing them into 12 inch lengths.

This isn't even all the scraps!

 Then I straightened one edge on each length and just started putting the pieces together.

 
I found that if I used this foot:

Does anyone know what it's called??
 
and a WIDE and LONG zigzag, they went together is a snap with a very smooth joint.


After a few DVRed episodes of Law and Order I had a very respectable pile of batt-lets.  I managed to join two large pieces into a batting that measures 45" X 35".  Since I use two types of batting, I made two separate batting blocks:  The Warm and Natural I cut into 11" X 11" squares.  I have enough to make a batting 55" X 77".  I also made a pile of 10.5" squares from Hobbs 80/20.  I have enough of those to make a batting 60" X 45".

Batt-let blocks on the right.  On the left are the scraps I am finally throwing away.


Pretty productive and now I am not bothered by having a pile of unusable scraps all over the place.

More about my ongoing clean up in future posts.


Are you watching the Oscars?  I am.  Isn't Ann Hathaway gorgeous!!


Thursday, February 10, 2011

Scrap Bin Tutorial


I was in Bonnie Hunter’s class at Road to California just minding my own business when the gal next to me (Hi, Buff) grabbed my little trash container and started gushing about it.  She showed Bonnie who also liked it so I decided to write a tutorial about it.  If you like it you can make one for yourself.


 MATERIALS NEEDED:
1 empty cube-shaped Kleenex box
Glue - I use Elmer's School Glue
A brush
A small container to mix glue and water
A piece of fabric 13 X 20.5
1" piece of hook and loop tape


Carefully open up the ends of the box


and remove the plastic film from inside the top.


Cut a piece of fabric 13 inches by 20.5 inches.  A fat quarter works great for this. If possible, leave the selvedge on one of the 13-inch edges.


Next, pour about  4 Tablespoons of glue into a small container.  I mix in about 1/2 teaspoon of water to make it easier to spread.  Stir it up well and use a brush to apply the glue.


I start on the top and center the fabric over the hole.  Place the fabric so the short side goes from open end to open end and the long side wraps around the box. I know this fabric looks different.  Good observation!  It is different because as I was putting this tutorial together, I thought a photo of this step would be good but I didn't take one when I made the original box.

Repeat the process for the two sides.

On the bottom, I overlap the ends, gluing the selvedge edge on top for a nice, clean finish.  Hopefully, you were able to leave the selvedge when you cut. If not, just turn the end under and use a bit more glue to make it all stick.


Let it dry for a good long time, at least until it’s not too tacky.  I put a fan on mine to speed it up a little.


Turn the box so the hole is on top.  Locate the hole and cut and "X" through the hole from edge to edge. Trim 1/2 inch inside the hole, so you are leaving about 1/2 inch of excess fabric.  Cut slits into the extra 1/2 inch of fabric about every 1/2 inch so it will easily turn to the inside of the hole.
 Working from the inside, apply glue around the hole and smooth the fabric to the inside.  When it looks good and smooth, go wash your hands.  Mine were a mess.


See how there is a little gap between the short and long flaps at the ends?


Cut into the gap right alongside the short end-flaps so there is a little fabric to wrap around the long end-flaps.


Trim the fabric on the short ends to about ½ inch.  Use more glue and turn the fabric to the inside.


Then, glue along the edges of the long ends and wrap that skinny strip of fabric over the edge.  This will give the outer flap a nice appearance.


Let it DRY COMPLETELY.   Now would be a good time for a cup of coffee or a glass of wine, put your feet up and just wait patiently.
OK, my fingers are clean and I am ready to continue.
Fold up 1/2 inch of fabric on the long ends and  press.   Fold up another ½ inch and press again.


Cut two 1-inch sections of hook and loop tape.
Turn the box so the hole is on the top.  Fold in the short side flaps and then the top and bottom flaps.  See how much the top flap overlaps the bottom flap. It should be at least the width of your hook and loop tape.  Adjust the folds of fabric on the top and bottom flaps so you have enough overlap.


Center the scratchy side of the hook and loop tape on the upper flap.


Using an old needle, sew the fabric to the flap, catching the hook and loop tape in the seam.  I also sewed around the tape to make sure it was good and secure.


 Fold the bottom flap up and mark where you need to attach the fuzzy half of the tape so it will line up with the scratchy side.

Put the tape on the RIGHT side of the bottom flap and stitch it as you did the top flap.


Step back and admire your new scrap bin.  It is ready to accept scraps and threads and what nots.


It folds flat so you can take it to class or retreat.  The ends open so you can empty it.  What's not to love?


I'd love to see a picture of yours if you make one.


Reduce Reuse Recycle.  It's a good thing.


Thursday, December 23, 2010

My UFO List

Oh the Shame. I'm not sure which is worse - that I have so many UFOs or that I could put my hands on 12 of them and take photos in fewer than 5 minutes!  These are just the ones that I've had hanging in plain sight for the last year few months so that I would be inspired to finish them.  It didn't work.  I am taking the leap with Judy Laquidara and committing to finishing these in the next year.
Here goes.

#1.  These are several BOMs that I won at my guild meeting at LEAST two years ago. They are so adorable, I have no idea why I have not put them together.


 #2.  This is a pattern I fell in love with in Mark Lipinski's Quilter's Home magazine (while he was still editor).  I cut it out, made several blocks, even prepared some of the applique and then it stalled.  It's the applique holding me up.  I hate the A word and I don't know what made me think that I would enjoy making this quilt.  BUT, I shall overcome my prejudices and finish this because I think it is SO DARN ADORABLE.


#3 SIGH.  I saw this YEARS ago in a book.  I spent a considerable amount of time collecting fabrics.  I put together a few blocks and I really don't like it.  So, I will make it into a lap quilt and call it done.


#4.  I hand pieced this center medallion on a fun family vacation about 5 years ago.  I would like to figure out some borders and get it finished.


#5 This is the start of a charity string quilt I made based on the String-X pattern from Quiltville.  It needs borders, backing, quilting, and binding.  Not much.


 #6. I have absolutely NO IDEA where this UFO came from.  I don't know where I got the inspirations, when I made it, nothing!  How scary is that?  I think it only needs to be sandwiched, quilted, and bound to be done.


#7.  I love this little quilt. It is so old that once again I have forgotten its genesis. I think it needs borders and the rest to make it a real quilt.  Maybe by next Christmas....


#8.  This little scrap quilt came to be by a bit of a circuitous route.  The scraps are from a memorial quilt I was commissioned to make (and DID make) a year ago.  I learned the quick block from some Los Angeles quilters I met at a retreat in Temecula, CA.  I want to finish it and give it to the woman who commissioned the original memorial quilts.  It needs to be quilted and bound.

#9.  Blogger wants this to be horizontal.  It doesn't make a lot of difference in either case.  The photo looks more jumbled than the quilt actually is because it is folded over a hanger.  I have the inner border picked out and cut (the black strip) I need to decide on an outer border and backing then get the thing quilted and bound.  Yeah, not too much!!


#10.  This is another charity string quilt.  I abandoned it when I couldn't figure out what to use for borders.  I auditioned EVERYTHING in my stash.  My artist sister came over one day and I explained my problem.  She walked over to my stash, picked up a fabric I would NEVER have considered and, of course, it was perfect. Needs to be bordered, quilted, bound.


#11. I learned the Split nine-patch block in a class I took from Karen Combs many years ago.  It is my go-to Leader and Ender project when I don't have anything else in the works. I have seen this setting online many times.  Some call it Chicklets.  Sorry, it's been so long that I no longer remember the websites.  It is put together in rows.  I need to put the rows together, pick a border and get it quilted and bound.


  #12.  And finally, this gem.  It is one of my favorites and I don't think I'll be able to part with it when it is finished.  Like so many of our quilts, it has a story. In my guild, I have a reputation for liking to make scrap quilts with a special affinity for 1/2-square triangles.  One day, a very elderly quilter brought me a ream-of-paper sized box carefully stacked with completed 1/2-square triangles in every color and pattern imaginable.  Her eyesight no longer allowed her to quilt and she hoped I could use the little blocks.  Heck yeah! I figured I could make something out of them.  Well, I have made lots of little quilts from her box of  treasures.  This is the largest.  I trimmed them up to a uniform size and worked really hard to pull matching squares that would look good as stars.  I sashed it and there it sat waiting for border inspiration.  Audrey passed away a few weeks ago and I am kicking myself that she never got to see this quilt.  I plan to keep it so I will always remember her.

Thanks, Judy, for this fun challenge.  I think it will make 2011 very productive for me.

Ponder this:

              Nothing that we do is so important that it can't wait
               so we can spend time with family and friends.