
I was in Bonnie Hunter’s class at Road to California just minding my own business when the gal next to me (Hi, Buff) grabbed my little trash container and started gushing about it. She showed Bonnie who also liked it so I decided to write a tutorial about it. If you like it you can make one for yourself.
MATERIALS NEEDED:
1 empty cube-shaped Kleenex box
Glue - I use Elmer's School Glue
A brush
A small container to mix glue and water
A piece of fabric 13 X 20.5
1" piece of hook and loop tape


Carefully open up the ends of the box
and remove the plastic film from inside the top.
Cut a piece of fabric 13 inches by 20.5 inches. A fat quarter works great for this. If possible, leave the selvedge on one of the 13-inch edges.

Next, pour about 4 Tablespoons of glue into a small container. I mix in about 1/2 teaspoon of water to make it easier to spread. Stir it up well and use a brush to apply the glue.
I start on the top and center the fabric over the hole. Place the fabric so the short side goes from open end to open end and the long side wraps around the box. I know this fabric looks different. Good observation! It is different because as I was putting this tutorial together, I thought a photo of this step would be good but I didn't take one when I made the original box.
Repeat the process for the two sides.
On the bottom, I overlap the ends, gluing the selvedge edge on top for a nice, clean finish. Hopefully, you were able to leave the selvedge when you cut. If not, just turn the end under and use a bit more glue to make it all stick.
Let it dry for a good long time, at least until it’s not too tacky. I put a fan on mine to speed it up a little.
Turn the box so the hole is on top. Locate the hole and cut and "X" through the hole from edge to edge. Trim 1/2 inch inside the hole, so you are leaving about 1/2 inch of excess fabric. Cut slits into the extra 1/2 inch of fabric about every 1/2 inch so it will easily turn to the inside of the hole.
Working from the inside, apply glue around the hole and smooth the fabric to the inside. When it looks good and smooth, go wash your hands. Mine were a mess.
See how there is a little gap between the short and long flaps at the ends?

Cut into the gap right alongside the short end-flaps so there is a little fabric to wrap around the long end-flaps.
Trim the fabric on the short ends to about ½ inch. Use more glue and turn the fabric to the inside.
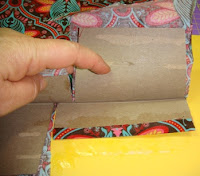
Then, glue along the edges of the long ends and wrap that skinny strip of fabric over the edge. This will give the outer flap a nice appearance.

Let it DRY COMPLETELY. Now would be a good time for a cup of coffee or a glass of wine, put your feet up and just wait patiently.
OK, my fingers are clean and I am ready to continue.
Fold up 1/2 inch of fabric on the long ends and press. Fold up another ½ inch and press again.
Cut two 1-inch sections of hook and loop tape.
Turn the box so the hole is on the top. Fold in the short side flaps and then the top and bottom flaps. See how much the top flap overlaps the bottom flap. It should be at least the width of your hook and loop tape. Adjust the folds of fabric on the top and bottom flaps so you have enough overlap.


Center the scratchy side of the hook and loop tape on the upper flap.

Using an old needle, sew the fabric to the flap, catching the hook and loop tape in the seam. I also sewed around the tape to make sure it was good and secure.
Fold the bottom flap up and mark where you need to attach the fuzzy half of the tape so it will line up with the scratchy side.
Put the tape on the RIGHT side of the bottom flap and stitch it as you did the top flap.
Step back and admire your new scrap bin. It is ready to accept scraps and threads and what nots.
It folds flat so you can take it to class or retreat. The ends open so you can empty it. What's not to love?
I'd love to see a picture of yours if you make one.
Reduce Reuse Recycle. It's a good thing.


